Getting Started With React - Part 3: The Flux Architecture
So we’ve got some sense about how we can work with React components to generate some nice looking views, and even how we can change them up in response to user input. Pretty nifty.
But what if we want to initiate more broad sweeping changes across numerous components? Or if we want to react to larger chunks of data from an API call? We might figure out a way to do so with what we already have, but our code could get pretty not-so-clean pretty quickly.
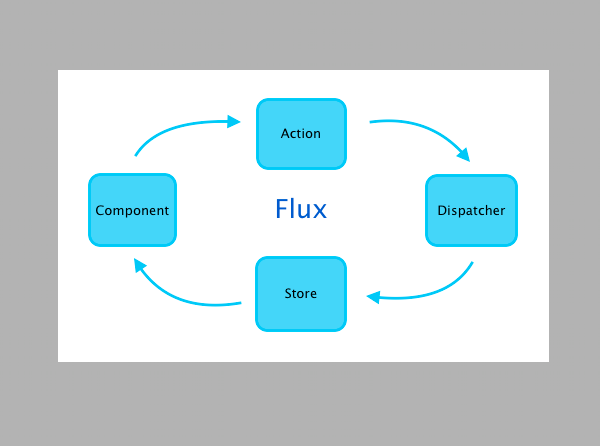
Luckily, there’s no need to indulge such indiscretions, thanks to the Flux architecture. Flux is a pattern for implementing a unidirectional data flow, one that makes it simple to implement significant and far-reaching changes to our views reliably and efficiently.
To get a sense for what we can do with the Flux architecture, we’re going to take a run at fitting it into our demo app. Since Flux is a pattern rather than a framework, we’ll be looking at a way to implement it rather than the way, but we’ll end up with a nice foundation for implementing further changes.
Before We Begin: Overview
If you’ve just starting to follow along with this post, you can catch up with the progress we’ve made so far by checking out the third commit of the demo react app Github repo.
Once you’re up to date, you’ll want to install Flux by running npm install --save flux.
Adding Flux to our project’s dependencies gives us access to the dispatcher, an important tool in the unidirectional data flow that characterizes the Flux architecture. The dispatcher mediates between the actions that are fired by components and the stores that update components.1
In this post, we’ll be implementing the Flux architecture to duplicate our app’s existing behavior. Though we won’t be adding any new features for the user, we’ll be tidying up the backend so as to lay the groundwork for future additions.
Step 1: Add a Dispatcher
The first thing we’ll want to do is create a dispatcher. It can live at js/dispatcher/dispatcher.js.
With this in place, we’ll be able to require and call the dispatcher from other parts of our application.
Step 2: Create an Action
After we’ve got a dispatcher, we’ll want to require and use it in a file designated to contain our actions. Create the following file at js/actions/demo_app_actions.js.
Here, the toggleLogo() method uses the dispatcher to broadcast a payload to the rest of our application. In this case, the payload includes keys for actionType and showReactLogo, which correspond to a string and a boolean, respectively.2
Note the bang (!) before showReactLogo, which means we’re dispatching a value for showReactLogo that reflects the opposite of whatever’s passed in. As will become more clear shortly, this is an example of handling state manipulation in the actions rather than the components.
Step 3: Open a Store
Once we’ve got actions that invoke the dispatcher to issue payloads to our application, we’ll want to register some callbacks with the dispatcher to handle those payloads. We do this on a store, which we’ll put at js/stores/demo_app_store.js.3
Let’s unpack what’s going on here.
In addition to the dispatcher, we’re requiring the EventEmitter and utils package from Node.js, which will enable us to inherit features that allow us to run callbacks and handle dispatched payloads.
We’ve also got an addLogoListener() method that registers a callback to be invoked whenever a “toggle-logo” event is emitted. We’ll use it in our component to complete state modifications initiated by the actions.
Finally, we’ve got a dispatchToken() method that contains a switch statement.4 The only case we’ve included so far corresponds to the actionType of our only action (“toggle-logo”), and it emits an event of that type storing the value that corresponds to the payload’s showReactLogo key.
Step 4: Refactor - add Constants
At this point, a lot of the behavior we’ve implemented depends on the actionType “toggle-logo”, and we’ve duplicated that string at several places in our code. It would be shame if something went wrong because of a typo in one of those places.
For this reason, it can be helpful to keep track of certain constants in a js/constants/constants.js file. We’ll be using this file to store values for the actionType of dispatched payloads right now, but we could also put any other important constants here as we go.
With this in place, we can change how we refer to the “toggle-logo” value for our actionType key in our action:
And in our store:
It’s only a minor detour but, like much of what we’re doing in this post, it will make life easier down the line.
Step 5: Edit Components
Now that stores are emitting events that carry values from our actions’ payloads, we can add listeners on our components to initiate change in response to emitted events. This is the logic that replaces the existing state transitions on our components.
The revised js/components/body.js file should be modified to look like this:
The important changes we’ve made here are twofold:
1) We’ve added a componentDidMount() method, which will be invoked automatically after the component renders, to register a callback via our addLogoListener() method from the store. That callback alters the component’s state to correspond to the emitted value of showReactLogo.
2) We’ve updated our toggleImage() method to fire an action instead of directly setting state on the component. No longer is our component manipulating state directly; instead, it passes much of that work off to the action, dispatcher, and store.
Wrap Up
At this point, our app is working exactly the same as it did at the beginning of the post. Exciting!
In all seriousness, though, we’ve just laid down an implementation of the Flux architecture which sets us up to make further changes with the reliability of unidirectional data flow at our backs. In future posts, we’ll take a look at some of the cool things we can accomplish with that in place.
-
For a more comprehensive description of the Flux architecture, check out the npm page for the Flux package. ↩
-
In subsequent posts, we’ll discuss how to pass and use more sophisticated data, like JSON data from an API call. ↩
-
It might feel a little redundant to be creating directories each time we’re adding a file here, and that’s fair. But dividing up our application into separate directories for components, actions, stores, and so forth initiates a nice organizational structure we’ll appreciate if and when we start accumulating more files of each type. ↩
-
We’ve called this method
dispatchToken()because it returns a token that we can use for controlling the order of execution of registered callbacks, but it’s also worth noting that this method is doing much more than that. ↩